van-inspection

Inspection time!

This is your opportunity to buy the best vehicle for your hard earned cash.  It may seem a little intimidating, but be bold and don’t be put off.

Do not wear your best clothes as you will be getting on the floor at times.  Bring a friend for a second opinion, who can also aid when operating the lights etc.

Bring a copy of the advertisement with you so you can check the description of the vehicle when you inspect it.

We are not suggesting that you do a full survey of each vehicle, as some you will notice straight away that they are not right for you.  The more vans you see, the more experience you will gain in determining the right vehicle for your campervan conversion.
Comfort

If you haven’t sat in this type of van before make sure the seat and controls are comfortable for you, and for any drivers of the vehicle.  If you are not comfortable, this is not the right van for you.

Cabin Interior, Lights, Controls and All

Check all the lights, dipped beams, indicators and hazard warning, number plate lights and interior lights.  Check all the knobs and buttons work including the wing mirror controls.  Just check that everything that can be pressed or switched works correctly.  Beep beep, check the horn.  Operate the wipers and water spray.

Check that the seats recline.  Check the condition of the seat belts.  Do they all work and can be clipped in.  Are there seat covers, check under for any damage or stains?  Check the radio and any entertainment systems work.

Body

Check that the panels are straight and not dented.  Carefully look for signs of rust or areas that may have been filled.  Ask if there has been any damage to the vehicle.  Surface rust can be treated, but heavily corroded areas will need lots of attention, beware!

Tyres (are expensive!)

The legal limit for tyre tread depth is 1.6mm across the central three-quarters of the breadth of the tyre around the full circumference of the tyre.  However, most manufacturers for safety recommend replacing tyres when they get to 3mm.  Take a tyre tread depth indicator with you.  Also check for any cuts, lumps and bumps which may render a tyre unsafe.

Under The Bonnet

First, check for any all leaks around the engine bay and on the floor.  Oil leaks can be expensive to diagnose and repair.  Check the oil cap and dipstick for a white milky substance which could indicate a problem with the head gasket, expensive!  Is the oil level right?  Too high could indicate it’s an oil burner and too low could indicate neglect.

The battery terminals should be clean and free of rust/gunk.  Look for any damage or temporary repairs to hoses.

Windscreen and Wipers

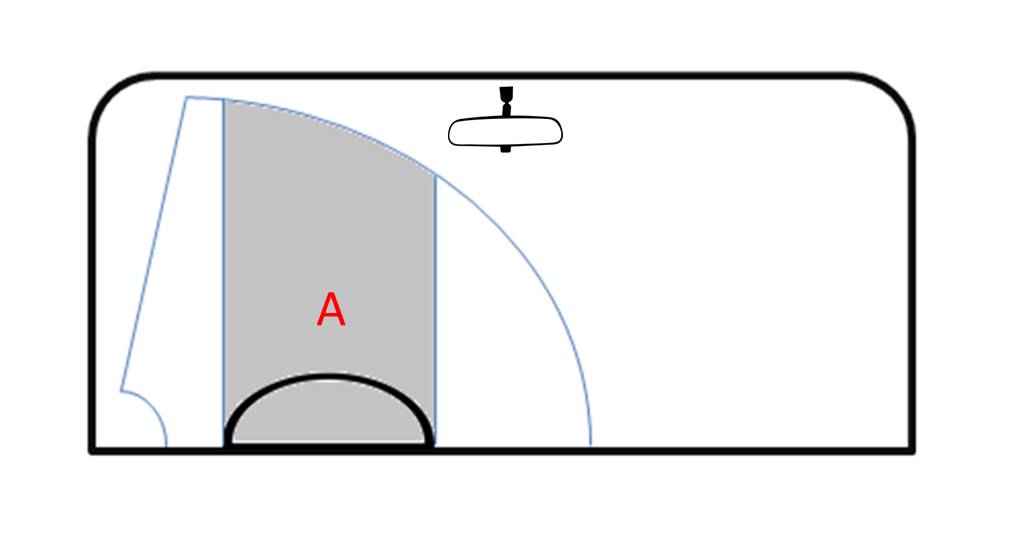
Any cracks or chips in the windscreen can render a van illegal and be an MOT failure.  For this purpose, the screen is divided into two areas. The ‘A-zone’, which is a 290mm band, centred on the steering column and bounded by the bottom and top windscreen wiper area.  Damage of over 10mm in the ‘A-one’, will likely result in MOT failure.  Damage larger than 40mm anywhere else of the windscreen will likely result in failure.  Wiper blades should be in a condition that adequately clears the windscreen.  If not this may result in MOT failure.

windscreen-repair-guide

Doors and windows

Check all doors open and close correctly. Check all locks work correctly.  Check the remote locking.   Open and close all the windows, whether by hand or electric.  Check for any cracks in the glass.  Also, does the vehicle have any more keys as new ones are very expensive?

Under the Van

Check that the vehicle is stationary and the hand brake is on.  Do not move under the vehicle but look from a safe point at the side.  Do not do this on a road.  Check the wheel arches for rust,.  Check the underside panels and chassis for rust and any damage.  Check that the exhaust.  Does it have excessive rust, holes or temporary repairs?